
Blog
Jaguar XJ12C Diecast Model: Rear Panel and Lights Customization
Oct
Part 5: Dealing with the rear of the diecast model car.
The first picture is showing the full amount of detail the Corgi has put on this diecast model which will need to be removed so a new flatter panel can be glued in place. This new panel will be a section of plasticard and glued with superglue.
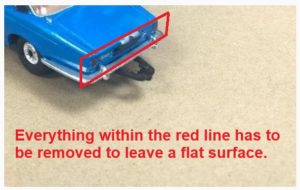
A tip here if you are doing similar work, always make the new section larger than you think for the area it is to cover because then you can trim it down to the correct size while it is on the model. If you think you can cut the section to the right size off the model, you will be surprised how many times it turns out to be too small and you can not easily add any extra plastic to make it the right size!
Surprise Detailing of the diecast model
I mentioned in my last blog about a surprise detail cropping up.
The customer had done some research to find out as much detail about the real car to help me in this build. When it came to the back of the car he said he could not find pictures actually showing the rear section and the arrangement of the rear lights and left it up to me to design the rear as I thought would be suitable.
I had a look myself on the internet and did manage to find a very good picture showing exactly what I needed but, this picture was found after I had almost finished the rear with a new number plate and rear light units and it was all painted!
In discussion with the customer and on him seeing the same picture after I emailed it to him, he was so shocked but pleased that I had found a picture and said it would be great if I could now re-do the rear so it does match what we can see in the picture.
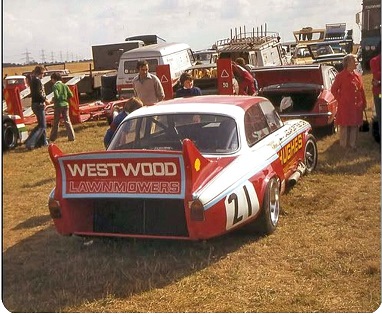
You can see an incredibly large opening that is almost the whole width of the car. I am not sure what purpose this has because looking closely it looks like a pair of huge radiators are in there and considering the size of the rear wings and their openings, these must be what they are.
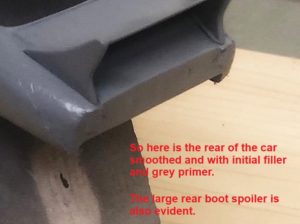
The model was now too far into the build to be able to cut that whole section away from the back of the body, so all I could do is do a drawing copying the detail in the same colour on some card. So, I had to rework the entire rear section but would now put the rear lights onto the new panel. The customer was happy with the compromise and once the model was completely finished he was very happy with what I had achieved!
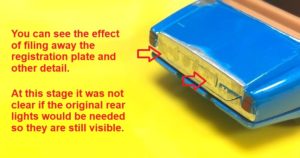
The rear lights are just small pieces of plasticard and now I know what the back looks like, I no longer need a registration plate because there is nowhere for it!
Next time I will be dealing with the front of the car and its new scoop bonnet!